
How to add approvals after processing bills in Receipt Bank

When your business regularly deals with hard copies of bills, invoices, and receipts, it can be a real challenge to maintain order.
Utilizing an Optical Character Recognition (OCR) system such as Receipt Bank can help you grab back some control over this paperwork, keeping you organized and on top of things.
How Does Receipt Bank Work?
In short, Receipt Bank extracts meaningful information via its app from original print copies of – for example – incoming Bills, and therefore saves your accountant from spending valuable time manually entering this important financial data.
If you are actively looking at implementing Receipt Bank – or if you already use it – for your business, then the question is: How do you factor in approvals to your workflow for Bills scanned with Receipt Bank?
Well, that’s precisely what we’ll be looking at in this post. But first …
Set Up ApprovalMax
ApprovalMax is a financial workflow platform designed to help you enforce compliance when it comes to processing Purchase Orders and Bills within your organization.
It only takes around 20 minutes to get started with ApprovalMax. Simply connect with Xero, invite your managers, define your approval steps and select who should approve in each case, and then activate your approval workflow.
It really couldn’t be easier!
How to Create a Seamless Workflow with ApprovalMax & Receipt Bank
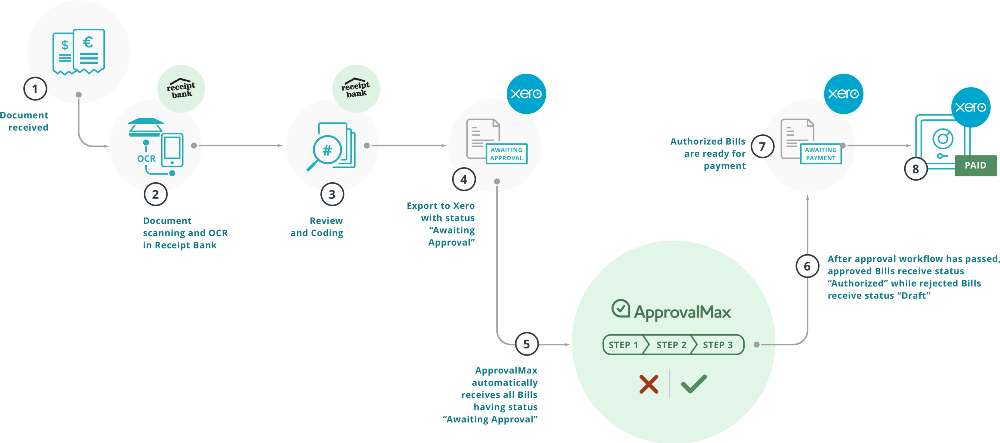
First, it’s important to understand how ApprovalMax interfaces with Xero. Our platform pulls Bills from Xero that have the status ‘Awaiting approval’.
ApprovalMax doesn’t currently integrate directly with Receipt Bank, so Xero acts as the go-between for the two platforms. By changing your Receipt Bank settings, you can publish Bills from Receipt Bank to Xero as ‘Awaiting approval’ so that ApprovalMax can pull them.
Here’s how you do it:
- Step One – Go to the Receipt Bank settings
- Step Two – Open the Xero Integration Settings
- Step Three – Change the ‘Publish items to purchases as’ setting to ‘Awaiting approval’
- Step Four – Click Save
That’s it! And now that you’ve updated these settings, when a Bill is published to Xero from Receipt Bank, it will automatically be sent to ApprovalMax for approval. No further action is required.
Note: In some cases, Financial Managers may wish to check that the Bill has been completed correctly before sending it on for approval. In this case, you will need to change the ‘Publish items to purchases as’ setting to ‘Draft’.
This would then allow the accountant to make any necessary changes to the Bill in Xero, before sending it for approval by clicking ‘Send for approval’.
What Are the Benefits of this Workflow?
By setting up this particular workflow to move Bills from Receipt Bank to Xero and subsequently to ApprovalMax, you ensure an end-to-end and seamless processing solution for incoming Bills – and one that does not fall apart at the approval stage.
Not only that, but you’ll save time for your accountant by eliminating the need for manual intervention, all while making sure that Bills are being approved by the appropriate people according to the defined approval matrix and authorization level of your organization.
And finally, you’ll keep approvers out of Xero and far from any sensitive accounting information that they do not need access to in order to do their job.
Streamline Your Financial Workflow with ApprovalMax
Declutter your desk and eliminate the need for manual data entry by using Receipt Bank. Then streamline your workflow by throwing ApprovalMax into the mix. You won’t be sorry!
If you’d like to find out more about ApprovalMax and its features, click here. And if you’d like to give it a go, sign up for your no-risk 30 day free trial here.
Do you have questions? Email us at info@approvalmax.com or register for our next webinar: for UK & US and for AU & NZ.
Find us on Facebook and Twitter.
Read our knowledge base on Uservoice.
Yours,
ApprovalMax Team