
How Approvers Work in ApprovalMax

Through the Eyes of the Approver: Four Simple Ways to Approve Documents
The top priority for the ApprovalMax team is making the lives of our users easier. When managers who are tasked with approving documents are happy, then so are we!
In this post, we’ll take you through the four ways in which approvers can make decisions in ApprovalMax.
1. Let’s Start with the Web Interface
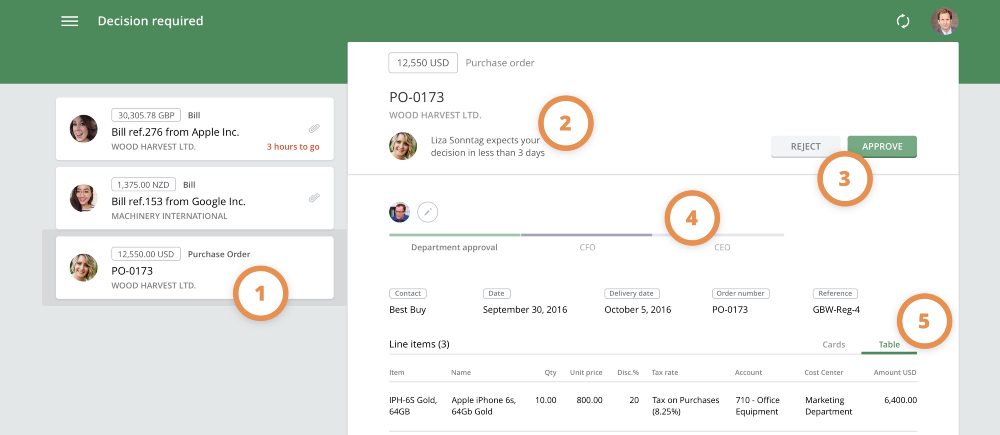
What does the web interface include?
- ‘Decision required’ list – this shows approval requests that are awaiting a decision from the current approver.
- Requester area – this shows who created the request and the decision deadline.
- ‘Reject’ and ‘Approve’ Buttons – these allow you to quickly reject or approve the PO.
- Request’s workflow – the green line indicates that this step was approved by all of the involved managers. The dark grey colour indicates that this is the current step, and the light grey is the upcoming step. It is therefore very straightforward to understand the request’s progress at a glance.
You can also click on the workflow to see who will be approving, or has approved, the request for a particular step. It is also possible to add other approvers with the ‘Change approvers’ option. - Line items – this shows the detail of what is being approved.
NOTE: You can quickly change the view of the line items from ‘Cards’ to ‘Table’ by using the tabs in the top right corner of the table. ApprovalMax will always remembers your preferred choice of view.
– The Card view is the most convenient way to quickly look through up to 10 line items.
– The Table view mimics Xero’s representation of the line items.
Below the Line items there is an Audit trail that shows all of the events and comments. Any user can leave comments.
2. Use Email When You’re On the Go
When you’re out of the office, It’s hard to open a browser each and every single time you need to approve a request. Particularly when it’s something that needs your decision right away.
If you don’t have the ApprovalMax app installed (and we’ll get to that) then the next best thing is to handle the decision via email.
It’s simple. It’s quick. And here’s how you do it:
Open up your email app and select the email from ApprovalMax, then either
- Click the ‘Approve’ button – and the current request will be approved.
- Or click the ‘Reject’ button – and the current request will be rejected.
- Then add a comment – Simply hit reply and write a message, and it’ll be posted as a regular comment.
And there’s another neat feature; if you select ‘Reject’, a popup will open in the browser prompting you to leave a comment explaining why the request was rejected.
This feature works on phones, tablets and desktops, so make sure you give it a go!
3. Welcome to Even Faster Approvals
If you’re interested in seeing some technical wizardry, then here’s a quick trick you can try:
- Open the ‘Approval required’ email.
- Click ‘Reply’.
- Type ‘Approve’.
- Click ‘Send’.
That’s it. The document will be approved. And the nice thing is that you can even approve documents using a voice command on your smartwatch. Welcome to the future!

4. Download Our Mobile App
The easiest way to stay in touch with your team when you’re on the move is to download our mobile app, available for iPhone or Android.
Once downloaded, you’ll receive push notifications about new approval requests.
And when you do, tap on them, open the request, and then tap on ‘Approve’, ‘Reject’ or leave a comment.
We suggest you download it right away!
You should also download the ApprovalMax Approvers Guide to learn more and share with your team.

Do you have questions? Email us at info@approvalmax.com or register for our next webinar: for UK & US and for AU & NZ.
Want to give ApprovalMax a try? Sign up for our 30‐day free trial.
Find us on Facebook and Twitter.
Read our knowledge base on Uservoice.
Yours,
ApprovalMax Team